Sharp Chemical produces Sealants, Adhesives, Waterproofing Materials.Our clients are from DIY users to professionals.We do not use cookie.


![]()


-
- Pick Up

-
- Pick Up


MENU
| |
| Firstly, there are some things to check before the operation. Clean the operation tools and equipment. Check the surfaces of the joint surfaces for wetness or existence of ice in Winter. If wet, please take appropriate measure to dry the surfaces. Please note that sidings’ surfaces might also be wet. |
 |
| |
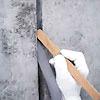
| To maintain the correct joint sizes while also preventing a three sided adhesion, use a back-up material in the joints. |
 |
| |
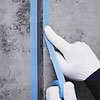
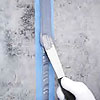
| In case primers and sealants flow out of the joint, stick a layer of masking tape outside the joint. It is surprisingly hard to apply sealant straightly; especially when the joint is cross shaped. Some skill is required. |
 |
| |
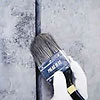
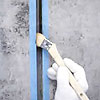
| Apply a primer is very important in the sealing process. A primer reinforces the adhesion strength between the sealant and the base, stop the bleed-through of dirt, and fastens the joint surfaces. Because of the importance of applying sealant, professional are especially careful in applying the primer. Because primers take time to dry, you can take your time in applying the sealants. But be careful for if you take too long, dirt particles in the air will build up on the primer. |
 |
| |
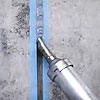
| For a multi-component sealant consisting of a main agent and a hardening agent, it must be mixed in a specially designed device. Afterwards, it can be loaded up to a caulking gun. The shape of the caulking gun as shown in the picture may be different from ones sold in home hardware stores. If you are unfamiliar with the directions of your particular tool, the sealant might cure inside the tool. It is recommended to consult professional staff before use. Please thoroughly fill in the joint with sealant as shown in the picture. In order or prevent air gaps, fill from the bottom up. The sealant will expand to fill in the joint. |
 |
| |
| Afterwards, use a metal spatula to spread the overflowing sealant and to even out the surface. Even though a metal spatula is not the best tool for spreading the sealant, it has a secondary purpose, to make sure the sealant more tightly bound to the surfaces, making for stronger adhesion—it is the preferred tool of professionals. |
 |
| |
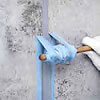
| The last step is to remove the tape from the sides of the joint. This part is important to note because this is where the sealant often fails. Do not peel the tape too hard from the wall or you might take the sealant off as well. Additionally, do not use an old ragged cloth to wipe the sealant—its colour may change to an ugly shade of white. These are the basic steps of applying a sealant to siding joints. |
 |
- Links
-